

This is an article compiling the strongest fleet comps for Siren Operation. Recommended for those who want to know the latest fleet comps using new ships and equipment. For those interested in beginner-friendly comps, please refer to past tutorial videos and blogs.
- First Fleet: All-Purpose Comp
- Second Fleet: Battleship Comp
- Third Fleet: Aircraft Carrier Comp
- Fourth Fleet: Mixed Comp
- First Fleet: Short Cat
- Strongest Fleet Compilations
Video explanations are recommended for this!
Introduction
The strongest fleet comps introduced here are not necessarily specialized for Siren Operation.
This is because the difficulty of Siren Operation has remained unchanged for several years. Meanwhile, players have become progressively stronger.
As a result, players now have significant leeway...
The current fleet composition policy now emphasizes synergy with other content.
For example, powerful equipment is limited in quantity and has a high usage rate in other content, so we sometimes choose weaker equipment for Siren Operation.
It's more convenient to reuse ships from other content. Especially ships used in one-shotting boss fleets for Ember battles are strong and well-equipped.
Since both Siren Operation and Ember battles are daily content, sharing resources here reduces the effort of changing fleets and equipment.
In other words, while these are called the strongest fleet comps, they largely reflect player convenience. Please understand this point.
About Farming
Basic Efficiency
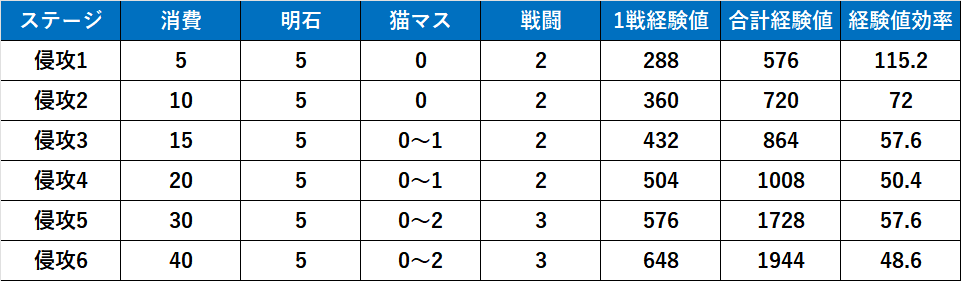
This summarizes the efficiency from Invasion 1 to Invasion 6 of secured sea areas. Experience is per allied ship.
The Chinese wiki states that the expected Action Points obtained from Akashi is 5.
The standard strategy is to repeatedly run Invasion 3, where Offnyamas appear, and aim for rare drops.
If you're short on time or aiming for commander experience, you might consider running Invasion 5.
Invasion 1 doesn't have Offnyamas, but with "5 cost - Akashi 5 = effectively 0 action points," you can run it infinitely.
Invasion 1 has higher experience efficiency than other stages, and by running it infinitely, you can trigger Emergency Commissions to earn fuel and diamonds.
Also, in actual gameplay, the Akashi expectation value can sometimes be positive. If you have enough time, you can increase your action points by repeatedly running Invasion 1, and then use those points to aim for rare drops by repeatedly running Invasion 3.
Example: If the Akashi expectation value per run is 5.1, then 150 runs = 15 action points = you can play Invasion 3 one more time.
However, please note that including everything, each run takes an average of 45-50 seconds, and 150 runs take about 2 hours.
Invasion 1 Verification Results
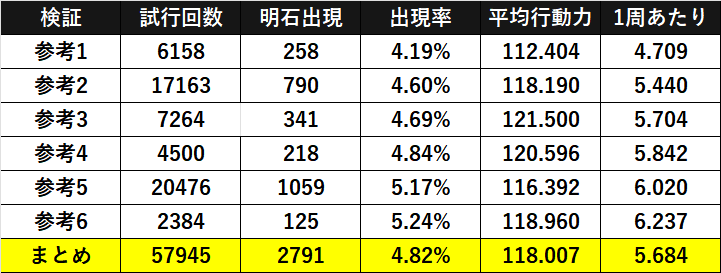
We have compiled the verification results for Invasion 1 on the mainland server.
Source → NGA
If you accept these results, while thousands of sorties might result in a net positive or negative, tens of thousands of sorties are expected to consistently yield a net positive.
★Average of 6 cases
Akashi appearance rate 4.82%
Action points gained per Akashi appearance 118
5.684 per run
If it averages out, you can expect +684 action points from 1000 runs.
1000 runs = approx. 13.2 hours. Then, add Invasion 3 runs equivalent to the gained action points. Note that considering Akashi appearances during Invasion 3 runs will take even more time.
Method
When repeatedly running Invasion 1, there's "with equipment," which disregards burden, and "skip equipment," which has less operational burden (this is a setting for when you encounter Siren equipment).
The reference data above does not include the action points obtained from "destroying information gathering equipment."
Destroying equipment rarely drops EN supply boxes. According to information from a mainland user, it looks like this.
★Destroy Equipment
4500 sorties
193 appearances
Appearance rate 4.29%
Blue boxes 20 / Purple 9
Expected action points 4.4
0.1887 per run
The return from destroying equipment appears to be quite small.
It's debatable whether it's worth increasing the frequency of auto-battle stops for this.
If you're going to seriously grind Invasion 1, you'll be short on coins to buy EN supply boxes, so it's best to set it to "with equipment" and simultaneously proceed with "Siren Scanning Device (consumes tokens)" and "Information Gathering Equipment (destroy)."
Rare Drops
There is information that the drop rate for gold parts in secured seas is approximately 0.138 pieces per catマス (Oni-masu).
Invasion 3 has 0-1 catマス per run, with an average of 0.5, so it's about 0.069 pieces per run. This calculates to roughly 7 drops in 100 runs.
Evaluation of Invasion 1 Grinding
According to mainland users, grinding Invasion 1 is not recommended for anyone other than new players.
No matter how much experience points you earn, you will eventually get stuck because the acquisition of limit break materials and mental units is limited in normal play.
Regarding the appearance of emergency commissions, it seems better to repeatedly clear Operation Record A3 or 2-4 with low fuel consumption.
Also, those who want to quickly get enough Action Points for 3 invasions should consider purchasing them.
★ Purchase Action Points (Weekly)
1000 Fuel → 100 Action Points (up to 2 times)
2000 Fuel → 200 Action Points (up to 2 times)
4000 Fuel → 400 Action Points (up to 1 time)
Total: 10000 Fuel → 1000 Action Points
You can purchase up to 1000 Action Points per week by consuming fuel.
For Commander Level 80, 10000 Fuel costs approximately \
Prerequisites
Here are some example fleet compositions.
Unless otherwise specified, we will proceed with the following assumptions.
★ Assumptions
- Adaptation adjustments are optimal.
- Ship level is 125.
- Affection level is 200 (Marriage).
- Ship technology is MAX.
- Equipment is fully enhanced (Gold or higher +13 / Purple +11).
- Offshores prioritize reload.
In principle, we will proceed assuming the best possible environment, but you should be able to clear it without problems even with slightly less investment.
Please note that results may vary even when playing under the same conditions.
Click ship icons to go to individual articles.
Click equipment icons to go to individual articles.
Individual articles may not exist.
First Fleet: All-Purpose Comp
 125♥200
 +13
+13 +13
+13 +13
+13 +13
+13 +11
+11 +10
+10 125♥200
 +13
+13 +13+13
 +13
+13 +13
+13 +10
+10 125♥200
 +13
+13[T0].png) +13+13+13
+13+13+13 +11+10
 125♥200
 +13
+13 +13
+13 +13
+13 +11
+11 +13
+13 +10
+10 125♥200
 +13
+13 +13+13
 +13+13
 +10
+10 125♥200+13
 +13+13+11+13+10
Example fleet composition for the first fleet. Commonly known as the "All-Purpose Fleet."
The main role of this fleet is to cover all content in the Siren Operation.
★ Main Roles
- Fast clearing
- Area control
- Fortress assault
- Enforcer hunting
- Hard Abyssal processing or chipping away
Thanks to the UR battleship "Lion," fortress assaults and Enforcer hunting are stabilized.
Lion's equipment is borrowed from the equipment used for the "Regensburg (META)" Ember battle, specifically from the Lion + Union fleet composition. For details on Ember battles, please refer to the blog.
Depending on your investment and the enemy's performance, you can one-shot the Hard Abyssal in April without submarine support. There were about 10 seconds remaining.
All Normal Abyssals have a healing reversal effect, so it's better to one-shot them with submarine support or leave them to the second fleet.
William D. Porter has been replaced with Moscow from the previous fleet composition.
The speed for 3 invasion clears is almost the same. If you focus on 3 invasion clears, the previous William seems fine.
On the other hand, the speed for 5 invasion clears seems to have improved by an average of 0.8 seconds. This is good news for those who focus on 5 invasion clears.
The drawback is that the three vanguard ships are heavy cruisers. If you're aiming for the ideal, you'll want to invest in gold parts for three heavy cruiser main guns. However, compromising on Ibuki's main gun might be acceptable.
Depending on other content, some players may not want to use Aquila in bomber mode. In that case, "Chise Asukagawa," "Formidable (μ Equipment)," or "Perseus" can be used as substitutes.
When using Formidable (μ Equipment), equip the two vanguard ships with "Nebula Dress" or "Gravity Shoes."
When using Perseus, be aware that the clear time for boss battles will be slower. It's primarily used for farming runs.
First Fleet: Farming Focused Comp
125♥200+13+13+13 +13
+13 +13
+13 +9
+9 125♥200
[T0].png) +13+13+13+13+13+10
+13+13+13+13+13+10.jpg) 125♥200+13
125♥200+13 +13+13+13+13+10125♥200+13+13+13+13+13+10
 125♥200+13+13
 +13+13+13
 +10
+10 125♥200
 +13+13+13+13+13
 +10
+10This is an example of a vanguard fleet optimized for one farming run.
The flow is to activate the special barrages of Watarase and Arizona (META) from Perseus's opening attack.
The clear time for Invasion 1 and Invasion 3 doesn't change much even without a vanguard. If you're farming these stages, it's a good idea to place training ships in the vanguard.
This is not recommended as it slows down fortress assaults and Enforcer hunts due to artillery cut-ins.
First Fleet: Semi-Rush Comp
125♥200+13+13+13+13+11+10 125♥200
[T0].png) +13+13+13+11+11+10
+13+13+13+11+11+10.jpg) 125♥200+13+13+13+13+11+10125♥200+13+13+13+13+13+10
125♥200+13+13+13+13+11+10125♥200+13+13+13+13+13+10 125♥200
 +13
+13 +13+13+13
 +13
+13 +10125♥200+13+13+13
 +13
+13 +13+10
This is an example of a semi-rush fleet for the first fleet.
Lion and Aquila are used in various content, so we are considering a strategy that does not use them.
The main role is to shorten time through fast farming runs, but be aware that it will be slower than the Lion fleet.
Fortress assaults are possible depending on your investment. It's better to leave Enforcers and Hard Avitas to the second fleet.
Boa Boa's position can also be filled by Luna from the DOAXVV collaboration.
Formidable (μ Equipment) can perform an opening airstrike if there are three μ Equipment ships in the fleet. Here, we equip the two vanguard ships with Nebula Dress or Gravity Shoes, and satisfy the μ Equipment condition with their effects.
If you find it troublesome to meet the equipment conditions, you can also use Chise Asukagawa from the Gridman collaboration.
Second Fleet: Boss Comp
 125♥200+13+13+13+13+11+10
 125♥200
 +13+13+13+13+13+10
 125♥200+13+13
[T0].png) +13+13+11
+13+13+11 +10125♥200+13+13+13+13+13
 +10
+10 125♥200+13+13+13+13+13+10
 125♥200+13
 +13+13
 +13
+13 +11+10
Example of the second fleet. Commonly known as the "Boss Fleet."
As the name suggests, its main role is to handle boss battles.
Here are the differences from the previous fleet example.
★Changes
Glorious (META) → Essex
Z52 → Eldridge
Unzen → William D. Porter
Since William is removed in the latest all-purpose fleet, he is adopted in the second fleet. Accordingly, we have increased the number of compatible Union ships.
If you use William in the first fleet, you can continue to use the previous Glorious (META) fleet.
Some players may be using certain ships in the "Regensburg (META)" Ember Battle. Even if you reuse their equipment, you can one-shot Hard Avitas.
There are two ways to fight Hard Avitas.
Pattern 1
First, challenge with the first fleet and submarine fleet. If the boss's durability remains, handle it with the second fleet.
Since this pattern significantly damages the enemy with the first fleet, if only a few remain, the second fleet's combat time will be short, sometimes ending with Alsace's opening main gun barrage.
Even if the enemy's durability remains, they should be dealt with in about 25 seconds.
Frankly, if the first fleet is strong enough, the ships and equipment used in Pattern 1 aren't that important.
You can pair Perseus and Asukagawa Chise to increase opening damage, or if you can tolerate main gun cut-ins, you can use Richelieu, who pairs well with Alsace.
Pattern 2
We aim to one-shot the enemy from the start with the second fleet.
In April's Hard Abita, I had 24 seconds remaining without submarine support. The first fleet under the same conditions had 10 seconds remaining, so it was about 14 seconds faster.
Experienced players can handle all Hard Abita without changing equipment. If you're a bit worried, using submarine support is recommended.
If, by any chance, enemies remain, you can deal with them using the first fleet's opening attack.
Third and Fourth Fleets
If you can form the first and second fleets introduced earlier, you will rarely need to fight with the third fleet or beyond.
Therefore, it's best to field ships that can provide fleet support as much as possible, or as a backup, use ships from other content to ensure they can at least fight minimally.
Here's a summary of ships with fleet support skills that you might want to use from those not yet introduced.
Vanguard: Fleet Support

There are few vanguard ships with fleet support skills, so you have room to use all of them.
Among these, Shima Kaze, Guam, and Kronstadt are particularly recommended.
Shima Kaze increases destroyer torpedo stat by 10% and launches a support barrage 30 seconds into the battle. Since the second fleet has 3 destroyers, the torpedo stat buff is very helpful.
Guam increases Union's anti-air and accuracy by 10%. She deploys an interception barrage at close range. Since the second fleet has 3 Union ships, the accuracy buff is helpful. The interception barrage also makes it easier to maintain the carrier's undetected status.
Kronstadt launches a projectile barrage 20 seconds into the battle, applying a 40% slow for 5 seconds to hit enemies. Additionally, if the fleet flagship is a battleship, she converges the main gun spread of all battleships by 2. Since neither the first nor second fleet has a stopping effect, a temporary slow effect is advantageous in boss battles.
Main Fleet: Fleet Support
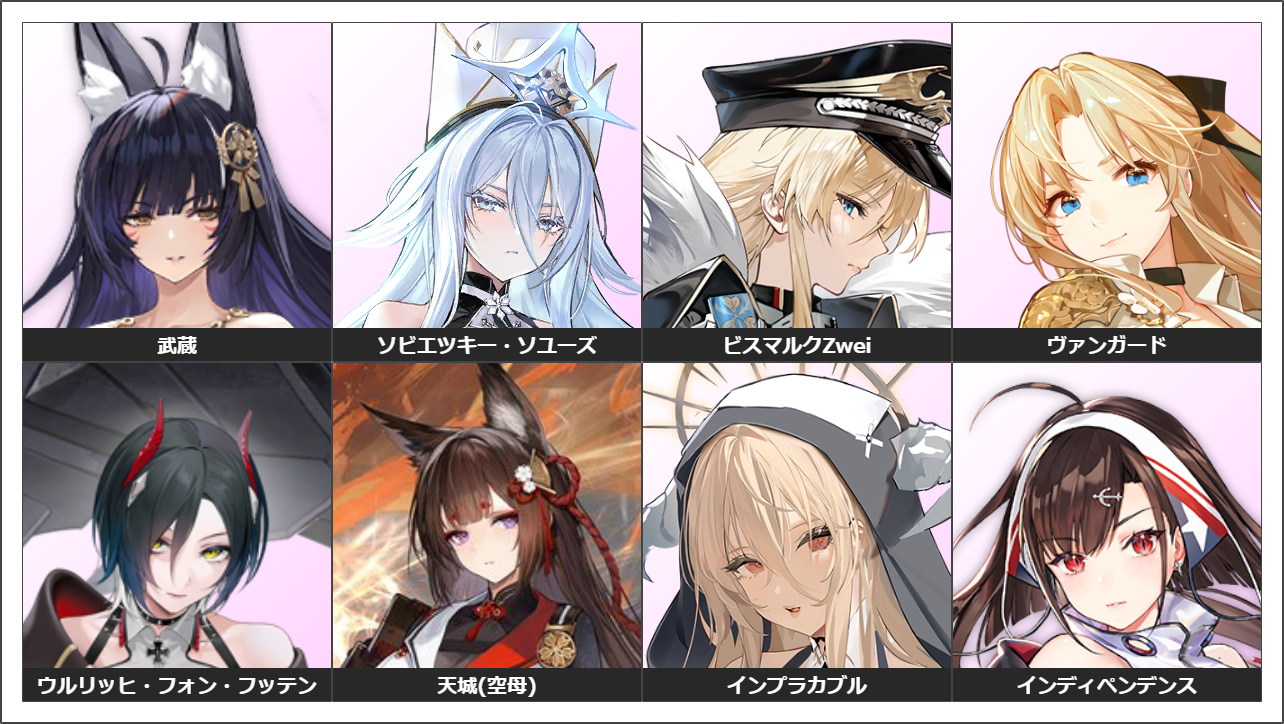
It's recommended to choose 6 ships from this group for your main fleet.
If you're choosing based on the attack power of the support barrage, Musashi and Soyuz are essential.
Musashi launches a support barrage at 15 and 35 seconds. She can use it twice and also provides damage support with her special armor-piercing ability.
Soyuz performs a wide-range attack with immediate impact. She also has damage-boosting and slowing effects, making her a useful combo piece, albeit only once.
Independence increases the aviation and loading of carriers and light carriers in other fleets by 4%. While its effect is small in Siren Operations, it's worth considering if you're looking for even a slight speed advantage.
In terms of influence on the second fleet, Vanguard provides support airstrikes + 10% firepower for Trafalgar, and Ulrich provides intercept airstrikes + 10% critical damage for Fritz Lemaire.
Submarine Fleet
 125♥200
魚雷_Bidder[T0].png) +13+13
+13+13 +10
+10 +13
+13 +10
+10 +10
+10 125♥200+13+13+10+13+10+10
 125♥200
 +13+13
[T0].png) +13+13+13+10
+13+13+13+10 125♥200+13+13+10+13+10+10
.jpg) 125♥200+13+13+10+13+10+10
125♥200+13+13+10+13+10+10 125♥200+13+13+10+13+10+10
Example submarine fleet composition.
Left formation
The left formation is attack-oriented.
Experienced players can one-shot Hard Abyssal without submarine support. In that sense, anyone can be chosen for the submarine fleet.
For now, it's desirable to include I-404, whose support for other fleets is powerful.
In formations that include I-404, the pattern of including Flasher and Archerfish, who have a slowing effect, is strong. Since these two ships have a slowing effect, they can coordinate with surface fleets that lack a stopping effect to aim for high damage.
The submarines in the upper row have difficulty targeting enemy ships within range, so they are equipped with snorkels and pressure hulls to ensure their attacks are completed.
The ideal equipment is to have all Rainbow G7e at +13, but the cost is too high, so the priority is low.
Right formation
The right formation emphasizes earning commander experience and Offy experience.
Arrange skills that reduce action point consumption to shorten the time until submarine support can be used with 0 action points.
With 3 ships, it can be reduced by up to 24%. What normally takes 1 hour can be used in about 45 minutes.
★Action Point Consumption Reduction
・ U-522: 6%
・Leonardo da Vinci: 6%
・Maggiore Baracca: 6%
・U-556(META): 12%
Additionally, in consecutive battles such as securing sea areas or attacking fortresses, it is possible to increase ammunition by equipping the submarine sail with a spherical cannonball.
For efficient progress, after resetting the Siren Operation, gradually secure sea areas with the sail formation. Once that's done, use the action point reduction formation until the end of the month. Then, at the end of the month, attack fortresses with the sail formation. That seems to be the general approach.
Conclusion
This time, we introduced the strongest formations for Siren Operations.
The Lion formation remains strong, and the first fleet and submarine fleet cover all Siren Operation content.
In the future, the second fleet may be used less and less frequently.
This article is intended for intermediate to advanced Azur Lane players. If you are interested in beginner formations for Siren Operations, please refer to past tutorial videos.
- First Fleet: All-Purpose Comp
- Second Fleet: Battleship Comp
- Third Fleet: Aircraft Carrier Comp
- Fourth Fleet: Mixed Comp
- First Fleet: Short Cat
- Strongest Fleet Compilations
Feel free to leave a comment!
Huh? I'm raising Albacore based on the October 4th article, but here it says Archer? Who should I believe...
The I-404 article selects Albacore from the average value without conditions. If you're thinking about the details, you'll want to swap them out depending on the virtual enemy or stage.
For example, in Siren Operation boss battles, it's basically single target, so the unguided barrages from the upper and lower rows rarely hit. Types that deal damage with barrages, like Albacore, are at a disadvantage.
On the other hand, if you prioritize the main story, Albacore's barrages can be effective, and she's chosen because she's strong against destroyers, light cruisers, aircraft carriers, and light carriers, which appear frequently.
Besides Albacore, there are quite a few submarines worth raising right now, such as Homura, U-556 (META), and Da Vinci, so if you don't want to compromise, you should raise them.